Tuesday, 1 May 2018

Boxes gb05

Moved the boxes from Malcolm's to gb05 yesterday. I photographed them, then I cut them up with Photoshop so that I could try different arrangements. I printed them in black & white & drew the figures on the prints. I will make some adjustments to the placement of the boxes as a result.

I also modelled the figures in clay--a useful exercise. I started with Plasticine because that's all I could find in my studio, but I ran out before finishing the second figure. Since neither Hobbycraft nor the school store had white Plasticine, I bought white 'air dry' clay. It turned out to be too hard to model comfortably & too soft to stand up under its own weight despite the wire armature. In the end I decided that the sagging quality suited the pose!


Finished Saturday 5th of May

Saturday, 28 April 2018

Danse Macabre

It's been two weeks since my last entry. Aside from this etching & the decorating of the still unfinished second vase, I have been working exclusively on the construction of wooden boxes for the big 'box sculpture'

These set of three Memento Mori etchings were born of the Danse Macabre chapbook I am still working on. This last (pictured first, below) was based on a photograph I took in a room of the Gran Canaria National museum. The four walls of the room were lined with glass door cabinets on whose shelves rested the remains of the island's indigenous population. They were of Beri-ber origin, the indigenous population of southern Morocco & the Sudan. They made their way to the then uninhabited island of Gran Canaria, as well as other islands of the Archipelago, at the time of Augustus.

They went on to live in complete isolation & evolved distinct cultures on each island over a period of more than 1500 years. It was in the 15th century that Spanish Christians arrived & wiped them out en masse within a few years. Some of the skulls, including small ones that belonged to children, & even smaller, toothless ones, that belonged to infants, show damage from the blunt instrument that killed them. Now, all that is left of the Guanche culture are these skulls, broken clay pots (I am working on a clay pot of my own based in shape on their designs, & in decoration, on their slaughter) & the intriguing stone layouts of their underground, communal dwellings.

Guanches


Death on the Bus

Death & the Multitude


Saturday, 14 April 2018

Lead collar, finished!

I could have simply done a vector drawing & taken it to the laser cutter. But I like it much better all rough & uneven. Below, some of the tools I improvised (the little chasing tools I made from 12 penny nails gave invaluable service in the end)

Thursday, 12 April 2018

Lead collar

My MO, always underestimate the job ;-) I thought I would finish it before work tonight, but six hours later & it is less than half done. Chuckle. But it is looking good. Once I have it cut out roughly, I hope to finish it easily with files & hammer. Tomorrow...

Materials, tools & procedures

The slips arrived today. I hope to begin & finish the second vase this coming week. I began building the boxes for the big 'sculpture painting' today but ran into problems at every step. Malcolm insisted on my leaving the workshop while he cut the ply. But he turned each piece over leaving rough edges on both sides. When I pointed it out to him, he said "Well, you're going to paint it anyway." First: I am not, & second, if I were I would like a smooth surface to do it on. No respect for the work we students do. Luckily I only gave him the measurements for one, small box, so he didn't get a chance to ruin all my expensive materials.

The next problem was the router table (equipment for a home workshop, not one that gets the usage we give it at Gray's). The way it is set up takes about ten minutes preparation for each piece & several minutes for each cut. I have almost 200 rebates to cut, so the ridiculous system is not viable. And that is without mentioning the damage the double-sided tape causes. I had to go out & buy a proper bit for the router at John Smith's. FIFTY QUID! Damn! I am now surviving on credit cards...

I did find blades for my coping saw at B&Q that work for cutting the lead sheeting. I hope to knock the vase's collar out in the hours left to the day before I go in to work at 11 tonight.

Thirty-three days left... at least I have the CCS essay nearly done.

Wednesday, 11 April 2018

Big box project


I originally planned to make the boxes for this, the 180 cm tall version, out of 3 x 4 inch beams fashioned into frames that would be covered by thin (3mm) plywood. When I presented my plan to Malcolm he suggested I use thin framing (1.5 inch beams) & thick plywood (1.2 cm) instead.

The reason he gave was that the thicker ply would allow me to mitre the edges for a clean finish. When I spoke to Keith, he agreed that this was a superior plan. The materials cost significantly more than they would have for my original plan, Right now, costs are important to me. I can get into debt & I can go without other things I need in order to lay my hands on art materials. But where it really hurts is if I don't have a budget for one project because I have spent on another needlessly.

Today, after some trouble, I got B&Q to deliver the wood to Malcolm's wood shop. The first thing Malcolm said was "It will be better not to do the mitred edges, because it will take too long."  I don't know why Malcolm would change his mind after I bought the materials appropriate to the plan he suggested, but it is clear that the reason is not based on my best interests. 

I insisted that I want to do it right, while he insisted I should do it the sloppy way. He was not happy about my insisting, but then, neither am I. I am frankly tired of the disrespect some teachers show for the work we students do. Decisions often seem to be based on the comfort of the professor & do not motivate students to challenge themselves or to do their best work. I will resist writing a list of such occasions I have experienced since beginning my studies here at Gray's, but this laziness & lack of respect has cost me time, money, & the disappointment of projects that wouldn't have failed otherwise.

Tuesday, 10 April 2018

Vase II


I have decided to use this mural as design for the vase. I will sgrafito the image over a white slip & then paint it with coloured clay slips (ordered & waiting for them to arrive). I will add the handles after the coat of white slip


like this:


Finished Friday 4th of May

Tuesday, 3 April 2018

Chasing tools

Tools made from 12 penny nails for embossing the lead collar for the vase

Thursday, 29 March 2018

The 100 Guilder Drawing

Drawing of Richard on Somerset etching paper 76 x 59 cm. Charcoal & paint (emulsion).

I am pleased with the liveliness, brevity & variety of line.

I added the paint (white house-paint on unbleached—ivory—paper, hardly visible here) for two reasons. To separate the upper body from its background in a subtle way (I did consider a more compromising colour) & to modulate some of the outer lines which had become too heavy in spots. Painting over a line to decrease its thickness has an effect that erasing can't. It is a bit like the difference between a painted line & one printed with wood-block or silkscreen

Five hours with the model & about the same again, without


Table-top Sculpture Painting

I will upload photos here as I advance.

Wood blocks dipped, sanded, & painted

I have drilled & added dowels to the blocks of painted wood, gluing the dowels on just one side so that it can be dismantled & the blocks painted individually (as well as together)

Assembled. I have tried something which I think is successful. I cut two of the blocks at a slight angle to give the whole more of a precarious sense of defying gravity. Looking at it as I made it, another idea occurred to me: separating the blocks by a space small enough to neither ruin the congruence of the painting or to see the dowels--giving it a sense of increased precariousness, as if the blocks danced in the air

Now that I am working with two columns of boxes, instead of one, it means 
painting the figure from six sides, not four. Or, you might count them as five
sides, since two are continuous--the belly view from above--though it is 
painted on two facing columns. But then, I will probably also paint the tops of the 
uppermost boxes, something which made little sense when making single column 
figures. So it might then be counted as eight sides (or seven!) 


Monday, 26 March 2018

Race to the Post

After discovering just last week that I must finish all I have in hand by the middle of May & not the end of June, I have quickened my pace.

1- Sculpture Paintings

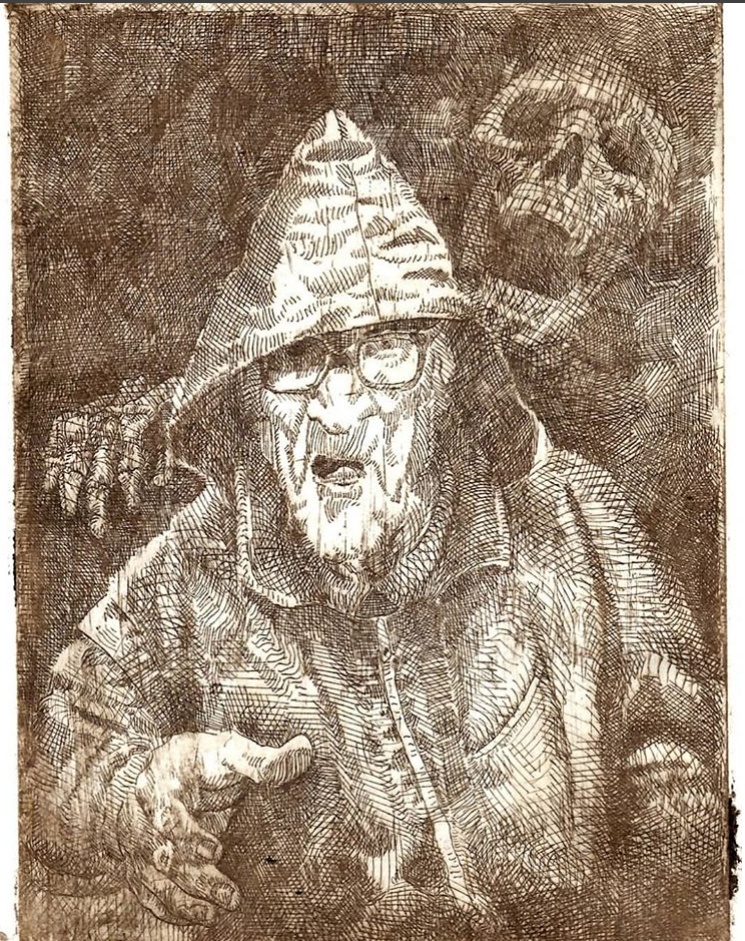
This weekend I worked with Richard, the model, on drawings for the 'sculpture paintings' (he was, as I expected, great! Not only does he get the pose I want right away--& hold it--but he acts as well. I say angry, he becomes the embodiment of anger, I say fearful...)

I have worked out all the essential detail necessary to plan the placement of the two figures on the wooden boxes, & hence, the boxes themselves. I will undoubtedly need more sessions when it comes to painting. Here, a few of the couple of dozen sketches;


I spoke with Malcolm in the wood shop about my plan &, from some sketches on paper towels, Malcolm gave me advice about thicknesses of wood. He also advised I move the parts with strength from the chunky frames I had planned, & thin plywood, to thick plywood & thin frames. Explaining that the mitred edges of the plywood will come out cleaner if they have a bit of heft.

We have a plan & a start date. I will get B&Q to deliver directly to the workshop the day after Easter break. Tonight, I will begin the calculations for the sizes of the boxes & quantity of materials I will need.

Calculating the dimensions of the nine boxes :( total height: 180 cm

with figures

boxes alone

calculating how much plywood in square cm, 
& how much wood beam in linear metres


2- Sculpture Painting, table size

I bought a wooden beam 6.9 x 7.0 x 240 cm from which I cut a six blocks of different sizes, & two with an angled side. I sanded them &, first, dipped them in white paint, & then gave them another coat with a brush. I have designed them for the figure of a falling man. It will be about 22 cm tall. I will see how this one comes out before attempting the second.


3- Vase I

Phil fitted me out with almost all I need to make the lead collar for the big vase. By sheer good luck, in a very old box, we found a square piece of lead sheeting, nice & thick, of exactly the right size (nothing else in the box would have worked to make it of a single piece). He didn't have any round-headed punches small enough for the detail I want, so I intend to buy some 12 penny nails & shape them on Phil's metal grinder.

I got all of the extra bits I wanted to attach to the vase done today & began painting over them. Excepting the lead collar, I am finally coming close to the final, enveloping, layers which I have been counting on since the beginning, to pull it from its present garish chaos, to something more harmonious. I have had a few failed projects this year, I hope my vague inner vision for this vase, comes together now at the end.

4- Vase II

I met with Matthew, the potter, about the design for our second pot. We looked at a photo of a Guanche pot whose shape I liked well enough to photograph in a museum in the Canaries. We talked about its dimensions &, endlessly, about possibilities for the handle of the lid (the pot I photographed had no lid). While designing the exact proportions for Matthew this afternoon (drawing below), I decided to do away with a handle altogether. 


So, I may have a new pot to work with as soon as the end of the week. I hope to finish the first with another week's work or so but, to complicate things a little, I have decided to do this new one as a proper ceramic, that is to say, all the decoration will be fired. I am now thinking of using the mural I did in the studio at school as subject. It would lend itself nicely to the second vase's shape--the large figure looming over the lid, the cringing figure painted over the shoulder of the pot, & perhaps, the tree sgrafito'd in the background. It also, by coincidence or sub-conscious, plays well with the subject of the sculpture painting. Oh, & if Phil can facilitate, I would like to forge a thick, rough metal ring for the hole in one of the handles.

5- Painting

I began preparing the big canvas (5 x 4' 150 x 120 cm) with a mixture of earth (dried on the radiator) & PVA glue.


I then painted over the whole surface to both soften the edges of the pebbles & stuff & to insure their firm adhesion. I also used the white paint to add more texture--allowing the paint to drip & also by dripping a la Pollock from a copper pipe


Third step: I painted over it again with Raw Umber (acrylic) adding more drips (shiny here because it hadn't dried yet). 

My reasoning for adding texture is that, since I am playing with the idea of kinetics, a randomly-uneven surface will disallow straight lines, making it livelier.


Finally, this weekend, at the end of our second session of sketching, I got a few strokes down just to see it started. (Section of canvas)


Thursday, 22 March 2018

Idea on the train

When I saw this warning sticker on the train door:


it occurred to me that I might do a series of warning stickers of my own. One might even make full size facsimiles, attach them to train doors next to the originals & surreptitiously record people's reactions. 

Here's a sketch for the first idea that came to me:


Sunday, 4 March 2018

Progress review (& orientation)

I am satisfied with the progress I am making on the projects Keith & I discussed. Even though I have been putting a lot of hours into etching (4 plates in the last two or three weeks) I have also kept the ball rolling on the other stuff.

I am having a great time in the print workshop doing etchings! There are so many possibilities that I have decided to be methodical. I am concentrating on one aspect per plate. The first, Death on the Bus (pictured a couple of posts below) I limited strictly to a relatively formal cross-hatching. Working up layers for dark areas, instead (as I mentioned in a previous post) of using finer hatching.

Advantages include: A good range of subtle variation especially in swatches of dark area. Darks that lack the velvetiness of aquatint but whose small perforations lend an interest only line can.

Disadvantages: A rather staid, Victorian feel. One misses curved line & instinctive—expressive—flourish.

Death & the Multitude also took me two plates & four proofs to finish, the same as the old man on the bus. I used this one as an experiment with combining different depths of bite. I like the result. One can layer hard expressive strokes over cottony, shallowly bitten layers. Since it was unrelated to examining the potential of varied darkness of line, I also let my hand loose to add noise (such as the squiggly lines around the border) & a kind of uncontrolled doodle mark I have used extensively over the surface generally. I also added tiny circles here & there; I won't know if they are discernible until tomorrow's acid bath. But, as I often find myself doing when painting I think that small, almost subliminal surface patterning, will add liveliness & interest to the drawing.

In fact, typical of having done the drawing without reference, it has come out a little cartoonish, a little rubbery, which makes the surrounding effects the stronger part of the print's general impact.

Here, the four states:
Plate II proof I
Plate II proof II
Plate II proof III
Plate II proof IV—final

And with final drypoint retouches (with less plate tone because 
I took the trouble to scrim with care)


Vase:

I have done at least one thing to bring the vase forward, every day (excluding week-ends) since the end of January. The vase's direction is still vague. So, I am taking a step at a time & waiting for an inner vision to coalesce. For the moment, I have been adding texture, mostly.

Summarily:

  • I blocked the figures in with palette knife & thick acrylic layers over dried layers (over the graded blue background)
  • After having struggled with many craquelure recipes & preparations in my life, with mixed success, I found the pseudo-plaster, plastic concoction that I ordered Online, excellent. One coat—the thicker you apply it, the bigger the cracks. I did the shoulder of the vase to the opening under the lid, in: thin-thick-thin layers, as I worked from top outward. I then applied a kind of Tuscan-wall-orange, somewhat opposite to the Ultramarine & Cobalt blue backdrop. If I had found the material sooner, I would have covered the whole vase as a first step.
  • I made moulds for sperm & breasts in many sizes, which I poured in latex. (I may use sperm for his fingers). I attached the first two breasts (of 20 or so) on Friday, using a good quality epoxy (overkill, perhaps, but I don't want any problems with bits falling off later). Once I have epoxied all the extraneous parts that I am going to, I will begin working over them with acrylic paints to bring them to the same stage of finish as the bodies. I will also need to rework the heads that were partly covered by the crackle layer. But I have decided it is a good thing. I would like the heads to stand out in higher relief than their bodies.
  • Another day, I took my Daler-Rowney FW acrylics (which disappointed me with its lack of bonding strength when I used them to paint on copper) &, using the eyedroppers incorporated in the lids, I dripped the paint at the point where the craquelure ends & let it drip to different heights while using a stick to make a web-like pattern out of the drips as they fell. Cadmium red on Ultramarine blue! The vase's overall coloration is tending to garish but these are early layers yet. I trust I will find the right solution as I muddle through. So far, I think it has only become more interesting with each addition, fingers crossed my luck holds till the end. 


'Sculpture Painting':

Leading from my last discussion with Keith, I took his suggestion for interacting figures, instead of single ones, as my starting point. I looked at a lot of things, especially figure groups by Rubens, & Greek vases & the like. And finally, hit on a memory of Bronzino's sexy Venus & Cupid. The dynamic contraposto combined with the spiral way the figures slot together—with some small changes—would be interesting from all four sides. 

I did a few sketches including some where I sketched the body separations in cubes, & I made the changes to the composition (including the removing of Bronzino's loving attention to the cherry-like qualities of Cupid's burnished bum :) & drew it from every side, before making paper cubes, two & a half inches to a side, to try the thing out in three dimensions. It was then that I realised that, for the piece to be successful, it needed more than an interesting painting on a pile of cubes & that, in fact, I shouldn't be using closely grouped figures at all. Aside from the painting, what needs to also be interesting is the pile of boxes itself. 

I then started sketching figures divided by empty areas that would be spaces between the cubes. I also looked for differences in width & depth so that, when looked on from any side, the boxes will stick out more or less not only in silhouette, but also toward & away from the viewer. I don't know where the idea came from, but I considered two adults pulling a child by opposing arms. I also tried out an exaggerated one-point perspective in the directions the adults pulled (obliquely toward the top). I am now more hopeful, however, for another idea I have sketched, two men; one menacing, the other defensive. 

I am now waiting to hear from Richard, whom Rebecca contacted for me, to arrange some sittings where I will try the idea out with sketches from life.

Changed the position of both of her arms


Changed his position

Considering non-cubic boxes

A plan for making a form in which to pour plaster cubes to try out different approaches (I realised that it would be easier to cut cubes from wood—easier to make as well as easier to make different sized boxes, as I realised it needs)

Paper cube construction


Granite cylinder (sideline):

I will do my utmost to spend little time on this—that I won't let it distract me from the end of year objectives.

I found a cylinder of Granite on a construction site, 10 centimetres in diameter & an uneven 20 or so of height. I have built a clay base for it so that it stands upright, & I have attached it with epoxy. I have done a couple of sketches of ideas for the terracotta figure I want rising from the top.


Kinetic figure painting:

I have a canvas that matches the one I used for the painting of Vaish. I have decided to continue the exploration with a companion piece with male model. I have done no sketches & I don't know in which direction my experimenting will go. I want it to grow from the simple beginning I plan, of its own accord: feeding on its own inspiration spontaneously. The idea I have to start with is a figure based on Ingres' Oedipus & the Sphinx.

I am waiting to arrange with Richard for this too.

Chapbook:

Outside of school work I have also continued making regular additions to the, now six month old, project.

Darwin's Fish:

On hold until I can find a little time.


Boxes gb05

Moved the boxes from Malcolm's to gb05 yesterday. I photographed them, then I cut them up with Photoshop so that I could try different ...